Note
Ophyd async is included on a provisional basis until the v1.0 release and may change API on minor release numbers before then
Using existing Devices#
To use an Ophyd Device that has already been written, you need to make a
RunEngine, then instantiate the Device in that process. This tutorial will take
you through this process. It assumes you have already run through the Bluesky
tutorial on The RunEngine.
Create Startup file#
For this tutorial we will use IPython. We will instantiate the RunEngine and
Devices in a startup file. This is just a regular Python file that IPython
will execute before giving us a prompt to execute scans. Copy the text
below and place it in an epics_demo.py file:
# Import bluesky and ophyd
import matplotlib.pyplot as plt
from bluesky import RunEngine
from bluesky.callbacks.best_effort import BestEffortCallback
from bluesky.plan_stubs import mov, movr, rd  # noqa
from bluesky.plans import grid_scan  # noqa
from bluesky.utils import ProgressBarManager, register_transform
from ophyd import Component, Device, EpicsSignal, EpicsSignalRO

from ophyd_async.core import DeviceCollector
from ophyd_async.epics import demo

# Create a run engine, with plotting, progressbar and transform
RE = RunEngine({}, call_returns_result=True)
bec = BestEffortCallback()
RE.subscribe(bec)
RE.waiting_hook = ProgressBarManager()
plt.ion()
register_transform("RE", prefix="<")

# Start IOC with demo pvs in subprocess
pv_prefix = demo.start_ioc_subprocess()


# Create ophyd devices
class OldSensor(Device):
    mode = Component(EpicsSignal, "Mode", kind="config")
    value = Component(EpicsSignalRO, "Value", kind="hinted")


det_old = OldSensor(pv_prefix, name="det_old")

# Create ophyd-async devices
with DeviceCollector():
    det = demo.Sensor(pv_prefix)
    det_group = demo.SensorGroup(pv_prefix)
    samp = demo.SampleStage(pv_prefix)
The top section of the file is explained in the Bluesky tutorial, but the bottom section is Ophyd specific.
First of all we start up a specific EPICS IOC for the demo devices. This is only used in this tutorial:
pv_prefix = demo.start_ioc_subprocess()
Next we create an example Ophyd device for comparison purposes. It is here to show that you can mix Ophyd and Ophyd Async devices in the same RunEngine:
class OldSensor(Device):
    mode = Component(EpicsSignal, "Mode", kind="config")
    value = Component(EpicsSignalRO, "Value", kind="hinted")


det_old = OldSensor(pv_prefix, name="det_old")
Finally we create the Ophyd Async devices imported from the epics.demo module:
with DeviceCollector():
    det = demo.Sensor(pv_prefix)
    det_group = demo.SensorGroup(pv_prefix)
    samp = demo.SampleStage(pv_prefix)
The first thing to note is The with statement. This uses a DeviceCollector as a context
manager to collect up the top level Device instances created in the context,
and run the following:
If
set_name=True(the default), then callDevice.set_namepassing the name of the variable within the context. For example, here we calldet.set_name("det")If
connect=True(the default), then callDevice.connectin parallel for all top level Devices, waiting for up totimeoutseconds. For example, here we callasyncio.wait([det.connect(), samp.connect()])If
mock=Trueis passed, then don’t connect to PVs, but set Devices into simulation mode
The Devices we create in this example are a “sample stage” with a couple of
“movers” called x and y and a “sensor” called det that gives a
different reading depending on the position of the “movers”.
Note
There are very few devices implemented using ophyd async, see ophyd_async.epics.devices and ophyd-tango-devices for some common ones associated with each control system
Run IPython#
You can now run ipython with this startup file:
$ ipython -i epics_demo.py
IPython 8.5.0 -- An enhanced Interactive Python. Type '?' for help.

In [1]:
This is like a regular python console with the contents of that file executed. IPython adds some extra features like tab completion and magics (shortcut commands).
Run some plans#
Ophyd Devices give an interface to the bluesky.run_engine.RunEngine so they
can be used in plans. We can move the samp.x mover to 100mm using
bluesky.plan_stubs.mv:
In [1]: RE(mov(samp.x, 100))
Out[1]: RunEngineResult(run_start_uids=(), plan_result=(<WatchableAsyncStatus, task: <coroutine object WatchableAsyncStatus._notify_watchers_from at 0x7fec1c54ae40>, done>,), exit_status='success', interrupted=False, reason='', exception=None)
If this is too verbose to write, we registered a shorthand with
bluesky.utils.register_transform: <my_plan(args) is translated to
RE(my_plan(args)). The command above can also be run as:
In [2]: <mov(samp.x, 100)
Out[2]: RunEngineResult(run_start_uids=(), plan_result=(<WatchableAsyncStatus, task: <coroutine object WatchableAsyncStatus._notify_watchers_from at 0x7fec1c54aa40>, done>,), exit_status='success', interrupted=False, reason='', exception=None)
We can get the primary reading of samp.x, in this case its readback value,
using bluesky.plan_stubs.rd:
In [3]: <rd(samp.x)
Out[3]: RunEngineResult(run_start_uids=(), plan_result=100.0, exit_status='success', interrupted=False, reason='', exception=None)
We can do a relative move of samp.x by 10mm, using bluesky.plan_stubs.mvr:
In [4]: <movr(samp.x, -10)
Out[4]: RunEngineResult(run_start_uids=(), plan_result=(<WatchableAsyncStatus, task: <coroutine object WatchableAsyncStatus._notify_watchers_from at 0x7fec1c549b40>, done>,), exit_status='success', interrupted=False, reason='', exception=None)
Individual Devices will also expose some of the parameters of the underlying
hardware on itself. In the case of a Mover, we can set and get its
velocity:
In [5]: <rd(samp.x.velocity)
Out[5]: RunEngineResult(run_start_uids=(), plan_result=100.0, exit_status='success', interrupted=False, reason='', exception=None)
Do a scan#
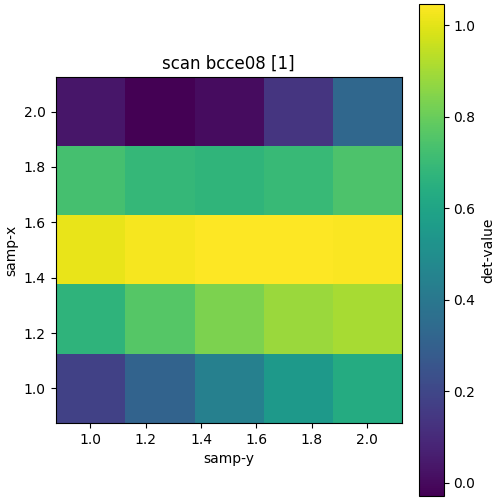
We can also use the bluesky.run_engine.RunEngine to run scans. For instance we
can do a bluesky.plans.grid_scan of x and y and plot det:
In [6]: <grid_scan([det], samp.x, 1, 2, 5, samp.y, 1, 2, 5)


Transient Scan ID: 1     Time: 2024-07-23 14:11:50
Persistent Unique Scan ID: 'bcce0818-a99e-43ce-9fce-84bb77b5c5ba'


Out[6]: RunEngineResult(run_start_uids=('bcce0818-a99e-43ce-9fce-84bb77b5c5ba',), plan_result='bcce0818-a99e-43ce-9fce-84bb77b5c5ba', exit_status='success', interrupted=False, reason='', exception=None)
There is also an “energy mode” that can be changed to modify the det output.
In [7]: <rd(det.mode)
Out[7]: RunEngineResult(run_start_uids=(), plan_result=<EnergyMode.low: 'Low Energy'>, exit_status='success', interrupted=False, reason='', exception=None)
Although this is an enum.Enum and programmatic code should import and
use instances of EnergyMode, we can set it using a
string value on the commandline:
In [8]: <mov(det.mode, "High Energy")
Out[8]: RunEngineResult(run_start_uids=(), plan_result=(<AsyncStatus, task: <coroutine object SignalW.set.<locals>.do_set at 0x7fec52db9340>, done>,), exit_status='success', interrupted=False, reason='', exception=None)
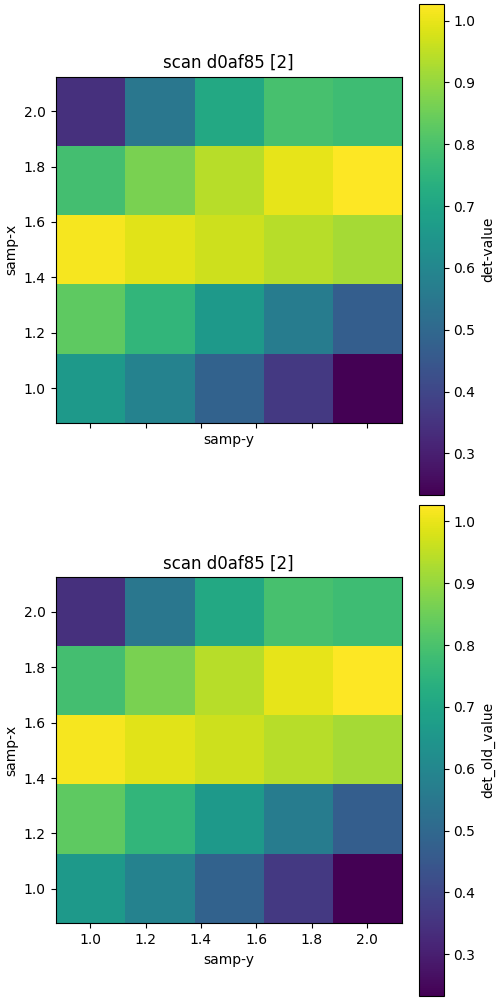
The same scan will now give a slightly different output. If we include the v1 device we can see it gives the same result:
In [9]: <grid_scan([det, det_old], samp.x, 1, 2, 5, samp.y, 1, 2, 5)


Transient Scan ID: 2     Time: 2024-07-23 14:11:54
Persistent Unique Scan ID: 'd0af8599-27c4-42fd-b94c-1cbc8ee37d1c'


Out[9]: RunEngineResult(run_start_uids=('d0af8599-27c4-42fd-b94c-1cbc8ee37d1c',), plan_result='d0af8599-27c4-42fd-b94c-1cbc8ee37d1c', exit_status='success', interrupted=False, reason='', exception=None)
See also
How-to Make a Simple Device to make your own Ophyd Async devices.