Using Devices#
In this tutorial we will create a bluesky RunEngine, instantiate some existing ophyd-async Devices, and use them in some bluesky plans. It assumes you have already run through the Bluesky tutorial on The RunEngine.
Run the demo#
Ophyd-async ships with some simulated devices and a demo script that will create them along with a RunEngine. Let’s take a look at it now:
"""Used for tutorial `Using Devices`."""

# Import bluesky and ophyd
from pathlib import PurePath
from tempfile import mkdtemp

import bluesky.plan_stubs as bps  # noqa: F401
import bluesky.plans as bp  # noqa: F401
import bluesky.preprocessors as bpp  # noqa: F401
from bluesky.callbacks.best_effort import BestEffortCallback
from bluesky.run_engine import RunEngine, autoawait_in_bluesky_event_loop

from ophyd_async import sim
from ophyd_async.core import StaticPathProvider, UUIDFilenameProvider, init_devices

# Create a run engine and make ipython use it for `await` commands
RE = RunEngine(call_returns_result=True)
autoawait_in_bluesky_event_loop()

# Add a callback for plotting
bec = BestEffortCallback()
RE.subscribe(bec)

# Make a pattern generator that uses the motor positions
# to make a test pattern. This simulates the real life process
# of X-ray scattering off a sample
pattern_generator = sim.PatternGenerator()

# Make a path provider that makes UUID filenames within a static
# temporary directory
path_provider = StaticPathProvider(UUIDFilenameProvider(), PurePath(mkdtemp()))

# All Devices created within this block will be
# connected and named at the end of the with block
with init_devices():
    # Create a sample stage with X and Y motors that report their positions
    # to the pattern generator
    stage = sim.SimStage(pattern_generator)
    # Make a detector device that gives the point value of the pattern generator
    # when triggered
    pdet = sim.SimPointDetector(pattern_generator)
    # Make a detector device that gives a gaussian blob with intensity based
    # on the point value of the pattern generator when triggered
    bdet = sim.SimBlobDetector(path_provider, pattern_generator)
We will explain the contents in more detail later on, but for now let’s run it in an interactive ipython shell:
$ ipython --matplotlib=qt6 -i -m ophyd_async.sim
Python 3.11.11 (main, Dec  4 2024, 20:38:25) [GCC 12.2.0]
Type 'copyright', 'credits' or 'license' for more information
IPython 8.30.0 -- An enhanced Interactive Python. Type '?' for help.

In [1]:
This has launched an ipython shell, enabled live plotting, told it to import and run the demo script packaged inside ophyd_async.sim, then return to an interactive prompt.
Investigate the Devices#
We will look at the stage.x and y motors first. If we examine them we can see that they have a name:
In [1]: stage.x.name
Out[1]: 'stage-x'
But if we try to call any of the other methods like read() we will see that it doesn’t return the value, but a coroutine:
In [2]: stage.x.read()
Out[2]: <coroutine object StandardReadable.read at 0x7f9c5c105220>
This is because ophyd-async devices implement async versions of the bluesky verbs. To get the value we can await it:
In [3]: await stage.x.read()
Out[3]:
{'x-user_readback': {'value': 0.0,
 'timestamp': 367727.615860209,
 'alarm_severity': 0}}
Run some plans#
Although it is useful to run the verbs using the await syntax for debugging, most of the time we will run them via plans executed by the bluesky.run_engine.RunEngine. For instance we can read it using the bps.rd plan stub:
In [4]: RE(bps.rd(stage.x))
Out[4]: RunEngineResult(run_start_uids=(), plan_result=0.0, exit_status='success', interrupted=False, reason='', exception=None)
and move it using the bps.mv plan sub:
In [5]: RE(bps.mv(stage.x, 1.5))
Out[5]: RunEngineResult(run_start_uids=(), plan_result=(<WatchableAsyncStatus, device: x, task: <coroutine object WatchableAsyncStatus._notify_watchers_from at 0x7f9c71791940>, done>,), exit_status='success', interrupted=False, reason='', exception=None)

In [6]: RE(bps.rd(stage.x))
Out[6]: RunEngineResult(run_start_uids=(), plan_result=1.5, exit_status='success', interrupted=False, reason='', exception=None)
Run a grid scan#
There is also a point detector that changes its 3 channels of output based on the positions of the stage.x and stage.y motors, so we can use it in a bp.grid_scan:
In [1]: RE(bp.grid_scan([pdet], stage.x, 1, 2, 3, stage.y, 2, 3, 3))


Transient Scan ID: 8     Time: 2026-07-16 15:36:23
Persistent Unique Scan ID: '73413794-5779-452c-8bc0-25fdf309685a'
New stream: 'primary'
+-----------+------------+------------+------------+----------------------+----------------------+----------------------+
|   seq_num |       time |    stage-x |    stage-y | pdet-channel-1-value | pdet-channel-2-value | pdet-channel-3-value |
+-----------+------------+------------+------------+----------------------+----------------------+----------------------+
|         1 | 15:36:23.9 |      1.000 |      2.000 |                  921 |                  887 |                  859 |
|         2 | 15:36:24.7 |      1.000 |      2.500 |                  959 |                  926 |                  898 |
|         3 | 15:36:25.5 |      1.000 |      3.000 |                  937 |                  903 |                  875 |
|         4 | 15:36:26.3 |      1.500 |      2.000 |                  976 |                  975 |                  974 |
|         5 | 15:36:27.0 |      1.500 |      2.500 |                  843 |                  843 |                  842 |
|         6 | 15:36:27.8 |      1.500 |      3.000 |                  660 |                  660 |                  659 |
|         7 | 15:36:28.6 |      2.000 |      2.000 |                  761 |                  740 |                  722 |
|         8 | 15:36:29.3 |      2.000 |      2.500 |                  537 |                  516 |                  498 |
|         9 | 15:36:30.0 |      2.000 |      3.000 |                  487 |                  467 |                  448 |
+-----------+------------+------------+------------+----------------------+----------------------+----------------------+
generator grid_scan ['73413794'] (scan num: 8)


Out[1]: RunEngineResult(run_start_uids=('73413794-5779-452c-8bc0-25fdf309685a',), plan_result='73413794-5779-452c-8bc0-25fdf309685a', exit_status='success', interrupted=False, reason='', exception=None)
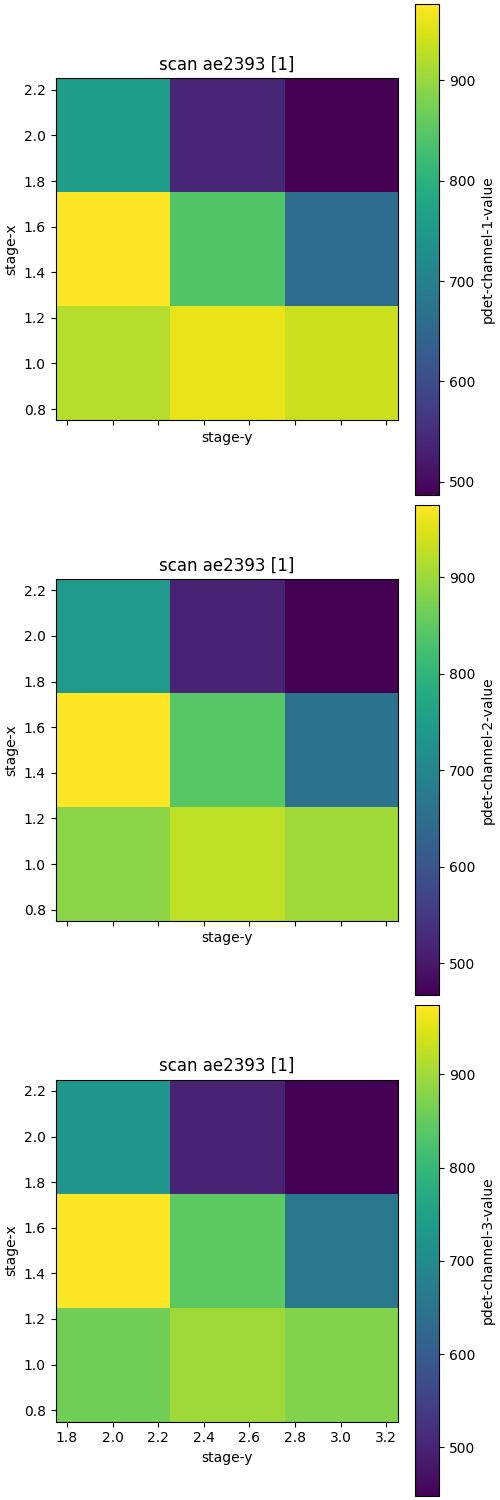
This detector produces a single point of information for each channel at each motor value. This means that the Best-Effort Callback is able to print a tabular form of the scan.
There is also a blob detector that produces a gaussian blob with intensity based on the positions of the stage.x and stage.y motors, writing the data to an HDF file. You can also use this in a grid scan, but there will be no data displayed as the BestEffortCallback doesn’t know how to read data from file:
In [2]: RE(bp.grid_scan([bdet], stage.x, 1, 2, 3, stage.y, 2, 3, 3))


Transient Scan ID: 9     Time: 2026-07-16 15:36:31
Persistent Unique Scan ID: 'e61126a4-259a-437a-9459-29461e9fce8c'
New stream: 'primary'
+-----------+------------+------------+------------+
|   seq_num |       time |    stage-x |    stage-y |
+-----------+------------+------------+------------+
|         1 | 15:36:31.1 |      1.000 |      2.000 |
|         2 | 15:36:31.2 |      1.000 |      2.500 |
|         3 | 15:36:31.2 |      1.000 |      3.000 |
|         4 | 15:36:31.3 |      1.500 |      2.000 |
|         5 | 15:36:31.3 |      1.500 |      2.500 |
|         6 | 15:36:31.3 |      1.500 |      3.000 |
|         7 | 15:36:31.4 |      2.000 |      2.000 |
|         8 | 15:36:31.4 |      2.000 |      2.500 |
|         9 | 15:36:31.5 |      2.000 |      3.000 |
+-----------+------------+------------+------------+
generator grid_scan ['e61126a4'] (scan num: 9)


Out[2]: RunEngineResult(run_start_uids=('e61126a4-259a-437a-9459-29461e9fce8c',), plan_result='e61126a4-259a-437a-9459-29461e9fce8c', exit_status='success', interrupted=False, reason='', exception=None)
See also
A more interactive scanning tutorial including live plotting of the data from file is in the process of being written in the bluesky cookbook.
Examine the script#
We will now walk through the script section by section and examine what each part does. First of all we import the bluesky and ophyd libraries:
from pathlib import PurePath
from tempfile import mkdtemp

import bluesky.plan_stubs as bps  # noqa: F401
import bluesky.plans as bp  # noqa: F401
import bluesky.preprocessors as bpp  # noqa: F401
from bluesky.callbacks.best_effort import BestEffortCallback
from bluesky.run_engine import RunEngine, autoawait_in_bluesky_event_loop

from ophyd_async import sim
from ophyd_async.core import StaticPathProvider, UUIDFilenameProvider, init_devices
After this we create a RunEngine:
RE = RunEngine(call_returns_result=True)
autoawait_in_bluesky_event_loop()
We pass call_returns_result=True to the RunEngine so that we can see the result of bps.rd above. We call autoawait_in_bluesky_event_loop() so that when we await bps.rd(x) it will happen in the same event loop that the RunEngine uses rather than an IPython specific one. This avoids some surprising behavior that occurs when devices are accessed from multiple event loops.
We then setup plotting of the resulting scans:
bec = BestEffortCallback()
RE.subscribe(bec)
This subscribes to the emitted bluesky Documents, and interprets them for plotting. In this case it made a table of points for the motors and each channel of the point detector, and plots of the point detector channels in a gridded pattern.
Just for the simulation we need something to produce the test data:
pattern_generator = sim.PatternGenerator()
This is passed to all the Devices so they can tell it the X and Y positions of the motors and get simulated point and gaussian blob data from it. In production you would pass around references to the control system (EPICS PV prefixes or Tango Resource Locations) instead of creating an object here. This is explored in more detail in Implementing Devices.
Next up is the path provider:
path_provider = StaticPathProvider(UUIDFilenameProvider(), PurePath(mkdtemp()))
This is how we specify in which location file-writing detectors store their data. In this example we choose to write to a static temporary directory using the StaticPathProvider, and to name each file within it with a UUID using the UUIDFilenameProvider. Other PathProviders allow this to be customized. In production we would chose a location on a filesystem that would be accessible by downstream consumers of the scan documents.
Finally we create and connect the Devices:
with init_devices():
    # Create a sample stage with X and Y motors that report their positions
    # to the pattern generator
    stage = sim.SimStage(pattern_generator)
    # Make a detector device that gives the point value of the pattern generator
    # when triggered
    pdet = sim.SimPointDetector(pattern_generator)
    # Make a detector device that gives a gaussian blob with intensity based
    # on the point value of the pattern generator when triggered
    bdet = sim.SimBlobDetector(path_provider, pattern_generator)
The first thing to note is the with statement. This uses a init_devices as a context manager to collect up the top level Device instances created in the context, and run the following:
If
set_name=True(the default), then callDevice.set_namepassing the name of the variable within the context. For example, here we callpdet.set_name("pdet")If
connect=True(the default), then callDevice.connectin parallel for all top level Devices, waiting for up totimeoutseconds. For example, here we will connectstage,pdetandbdetat the same time. This parallel connect speeds up connection to the underlying control system.If
mock=Trueis passed, then don’t connect to the control system, but set Devices into mock mode for testing.
Within it the device creation happens, in this case the stage with x and y motors, and the two detectors.
Conclusion#
In this tutorial we have instantiated some existing ophyd-async devices, seen how they can be connected and named, and used them in some basic plans. Read on to see how to implement support for devices via a control system like EPICS or Tango.